반응형
안녕하세요~
오늘은 UIProgressView에서 TrackView와 Progress의
ConerRadius를 조정하는 방법에 대해서 정리하려고 합니다 : )
일단 ProgressView를 생성하고
Subviews를 출력해보면 다음과 같이 나오는 걸 확인하 실 수 있습니다.
[<UIImageView: 0x7fe5d210e970; frame = (0 0; 0 0); opaque = NO; userInteractionEnabled = NO; layer = <CALayer: 0x600003046340>>, <UIImageView: 0x7fe5d210ed50; frame = (0 0; 0 0); opaque = NO; userInteractionEnabled = NO; layer = <CALayer: 0x600003046280>>]
두 개의 ImageView가 존재하는데 첫 번째는 TrackView, 두 번째는 안쪽의 Progress에 해당하는 부분입니다.
1. 기본적인 ProgressView의 모습
- ProgressView의 TrackView와 Progress의 컬러만 정해준 경우
progressView.trackTintColor = UIColor.lightGray
progressView.progressTintColor = UIColor.red

progressView.progress = 0.5

2. CornerRadius 적용 후 모습
- TrackView의 ClipsToBounds를 True값으로 주면 다음과 같이 TrackView의 CornerRadius가 적용된 걸 확인하 실 수 있습니다!
progressView.trackTintColor = UIColor.lightGray
progressView.progressTintColor = UIColor.red

progressView.clipsToBounds = true

progressView.progress = 0.5

3. Progress에도 CornerRadius를 적용하고 싶다면!
- 위에서 설명했던 Subview에 접근해 ClipsToBounds값을 True로 변경하고 CornerRadius값을 주면 다음과 같이 나오게됩니다.
progressView.trackTintColor = UIColor.lightGray
progressView.progressTintColor = UIColor.red

progressView.clipsToBounds = true
// 위에서 설명한 것 처럼 ProgressView의 subView[1]은 Progress
progressView.subviews[1].clipsToBounds = true

progressView.progress = 0.5
// 이런식으로!
progressView.layer.cornerRadius = 8
progressView.layer.sublayers![1].cornerRadius = 6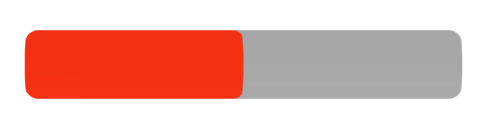
더 좋은 방법이 있다면
댓글로 알려주세요~
그럼 이만 👋🏻 👋🏻 👋🏻
반응형
'iOS > Swift' 카테고리의 다른 글
| [Swift] WebView의 백그라운드 컬러를 Clear로 변경 & Content Size 가져오는 방법 (0) | 2022.11.09 |
|---|---|
| [ Swift ] UITableViewCell의 간격을 설정하는 방법 (1) | 2022.09.21 |
| [ Swift ] UITextField의 좌우 패딩을 주는 방법 (2) | 2022.09.19 |
| [ Swift ] UIStackView에서 여러 버튼을 정렬하는 방법 (0) | 2022.09.18 |
| [ Swift ] 간단한 토스트 메세지 구현하기 (feat.UILabel) (0) | 2022.09.16 |